Follow my blog with Bloglovin
I'm also on twitter @nevernakednails
Monday, April 30, 2012
Sunday, April 29, 2012
Kleancolor Candy Cast mani #1
I couldn't wait until tomorrow to post this. I'm spammin' up your feeds! kidding..
Anyway, this is what I did to my nails when I realized I quickly had to think of something else to do, before I showed up at work with nails matching the same colors as a friend's. (Funny, she didn't even have to work that night.. I'm losing my mind..) Now, I realize this is not my best work. It would've been a lot cooler if my dots were smaller. Eh.. So, I wanted to use more of my Kleancolor minis that came in. I'm also planning on swatching these because I'm planning on being adventurous this summer! Anyway, here it is:

BAM! these colors are so in-your-face, I love it!
(BTW on the upper right corner of my thumb and middle fingers are hearts, not even bigger dots lol)
As you can tell and probably already know, neons are just weird to photograph.. These pictures are almost dead on, especially in the refrigerator. The ones outside are just less bright. Actually in the fridge the colors appear to be all a liiiittle darker than they really are..or maybe just more saturated..I don't know, they're cute on my hands though!


This is one layer of LA Colors base coat, two coats of Sally Hansen's Hard as Nails French White, then starting at the base of my nails with a medium dotting tool, Kleancolor's Neon Orange, then Neon Yellow, Neon Lime, Neon Pink, and then above that on my thumb and ring finger I tried to add some Neon Amethyst dots. A niiiice layer of Poshe on top =]
And I think I should've used smaller dots. This blog is really going to help me learn from my mistakes lol
So when I got home from work this morning of course I did my nails again...because if I think I've messed up, or it could've been done differently, or made better in some way, I'm definitely gonna do my nails again. Moisturizing is really the key lol
Later I'll post about what I did to my nails this morning, and hopefully my Konad stamper will be at my door =] I really think what I have going on right now would be the perfect background for some sweet sweet stampage.
Thanks for reading!
Dot Experiment
As I said before, my dotting tools are here and I have begun the fun!
My skills are still needing improvement, both in the steady hand area and placement and whatnot of said dots...
this ain't my old high school pointillism assignment! Though it could be, and that's an idea I'm putting into my head..someday it will become real.
 Anyway, here is the mani that I had to completely redo because I realized I was basically subconsciously copying off of a friend, and that's just lame! This is my cheap-o base coat (i think it's LA Colors..) plus two coats of Sally Hansen's HaN French White on most of my nails, and then for my accent nail I used Kleancolor Neon Aqua for my bases.
Next, I grabbed a dotting tool and started dottin'! I went over my white nails with mediumish sized blue dots in the Neon Aqua, and decided that could not be enough. I went back with a much smaller dotting tool and used Finger Paints I have no idea what red I used still.. and randomly put them in white spaces. I even made a little heart at the tip of my accent nail, by making two dots next to each other with a tool and then just drawing them together to make the heart bottom. I went over it all with a nice coat of Poshe, and viola!

My skills are still needing improvement, both in the steady hand area and placement and whatnot of said dots...
this ain't my old high school pointillism assignment! Though it could be, and that's an idea I'm putting into my head..someday it will become real.

Next, I grabbed a dotting tool and started dottin'! I went over my white nails with mediumish sized blue dots in the Neon Aqua, and decided that could not be enough. I went back with a much smaller dotting tool and used Finger Paints I have no idea what red I used still.. and randomly put them in white spaces. I even made a little heart at the tip of my accent nail, by making two dots next to each other with a tool and then just drawing them together to make the heart bottom. I went over it all with a nice coat of Poshe, and viola!

Sorry about the messy clean up, I really thought I got it all and then my camera tells me otherwise...
I still haven't really swatched my Kleancolor mini collection, except for my blue accent nail above. From what I can tell from doing that one nail, it's a nice creme, opaque in two coats with a nice shiny finish. I don't have any full-sized Kleancolor polishes but the brush is surprisingly nice and wide for the little bottles. I will definitely be wearing these colors this summer!
Anyway, I'll post more about my even better Kleancolor dotted manis tomorrow!
Saturday, April 28, 2012
China Glaze Stone Cold & Secret Periwinkle
I would like to start this post off by saying my inspiration for this mani came from Nailside's blog, a super awesome blog that I love to follow! I follow a lot of nail blogs, and I do love them all. Nailside's manis just always seem to speak to me though, they're always saying things like "You know you want to try to recreate this somehow, someway!!" And I reply back with "Yeah, but I really need to invest in some actual scotch tape instead of just regular stupid tape that lets polish seep through around the edges of my fingers and throws the whole thing off.." you get it..
anyway, she usually has some easy to follow tutorials for her tape manis and whatnot, and I think this one is the mummy one. The only difference that I can think of is I'm not sure (because I'm too lazy to check right now) if she leaves her tips out when doing these manis or if she angles the tape still on the tips of her nails. Either way, I tried to get my tips as straight as I could. This is two (maybe three?) coats of CG Secret Periwinkle. Not that two coats wasn't dandy, but I think this was the day I was like "I'm gonna do THREE!!" I'm just a maniac..
horribly indoors:

Then I decided to do the mummy tape mani which can be found here,
And I honestly think it would've been better if my nails were a bit longer. Oh well! Then I did a layer of CG Stone Cold (another great one from the Hunger Games collection) and then I think I did a layer of Gelous on top.
Refrigerated:

Now, I've gone all out of order. This mani was done before my first post of Magic Wok nails, which was done before my For Audrey Simple nails. The pictures are obviously horrible compared to the other post's pictures, and I doubt those can be much better so...sorry about that! I'll definitely be uploading some newer pictures tomorrow.
I worked with my dotting tools for the first time today! I had to redo my nails though. I took pictures first, but I realized after I had gone off to bed and woke back up in the middle of the day that my colors (Sally Hansen's Hard as Nails French White, Kleancolor Neon Aqua, a red from Finger Paints but I can't actually remember the name right now and finding it online would be a headache) were totally the same colors of a work friend's mani that she had showed me the day before and though I was using a white base with blue and red dots and hearts and hers was totally different, I refused to suffer the embarrassment of copying a friend's mani. I always have better nail ideas when I'm falling asleep or waking up. I really need a notebook by my bed because I always think of something really cool but I don't really remember it much when I wake back up..
Have a great day =]
For Audrey!
Today I would like to show you For Audrey from China Glaze. As if you haven't already seen her...but you haven't seen her on my fingers!
Okay so it's nothing spectacular or different from what you've undoubtedly seen before, but it's just sooooooo pretty. This has my super cheap base coat, then two coats For Audrey, with Poshe on top. Such a pretty shade of teal. I hope I'm labeling it right...teal is such a gray area..(haha)
anyway, today's photos are completely refrigerated!

Wearing this makes me feel..lovely!

But after about 24 hours I knew I had to do something. Ever since I started going overboard with nail polish I just can't seem to leave any one color mani alone for very long. At least this one lasted a whole day! I didn't have my dotting tools yet (do now, can't waaaaaiiiit to use them!) so I was using a straight pin and I stuck it in one of those thick oval shaped make up sponges and used that, dipped in Sally Hansen's Hard as Nails French White to do this:

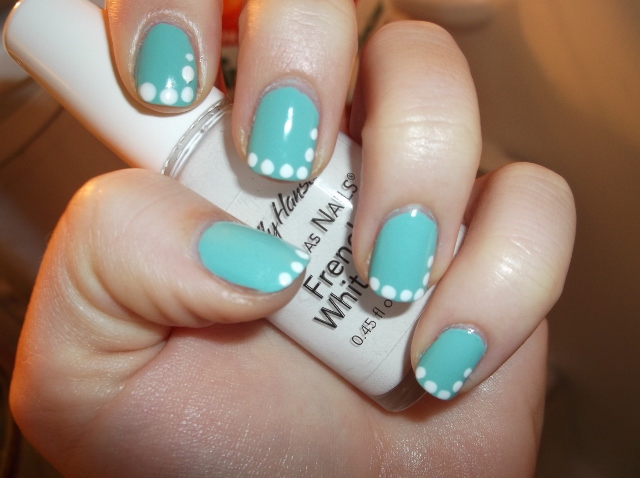
I really didn't want to do anything to take away from For Audrey, and I really just wanted to try and see if I could keep it simple. It's nice to challenge yourself sometimes! I think I succeeded.
On a different note, My new Cheeky plates and my Kleancolor candy cast minis came in the mail today! yaaaaaayyy
Now I just need my Konad stamper! It's on the opposite side of the country still..=/
I would like to thank anyone taking the time to stop by and hopefully enjoy this=]
Friday, April 27, 2012
Pictures, and a little about me as well:
First off, I'm still new to this game. My nail polish collection has doubled (probably a little more than doubled..) in the last couple of months. I'm 21, and I've loved doing my nails since I was a little girl. The thing is, Once I turned 16 I had to get a j-o-b and damnit if I had to go and get one at a fast food chain that doesn't allow fun in my uniform. Oh, I got by with the little things. Getting my nose pierced, dying my bangs ultraviolet.. but for some reason you just could not have your nails done in any sort of polish!
Thursday, April 19, 2012
not even sure about this
I have no idea what I'm doing here.
But I love doing my nails! I have decided to fall in line and create a nail blog like a lot of other people have done, but I hope mine will be different somehow. A little zazzier? I feel like I should somehow incorporate Sheldon Cooper into my nails now...hmm...
Well, I have no pictures yet. I suppose that's the other half of this, and I'm really behind. I have high hopes! That's a completely stupid thing to have by the way.
Subscribe to:
Comments (Atom)